 |
Mitsubishi Click 120 | |||
|
|
 |
|||
|
E-shop
|
||||
|
Mitsubishi Electric Changes for the Better - Mitsubishi Electric Changes for the Better - Mitsubishi Electric Changes for the Better - Mitsubishi Electric Changes for the Better - Mitsubishi Electric |
||||
|
|
Mitsubishi Click 120 Mitsubishi Click 120 is a photosystem following the previous Click 5000 model. It is built on a high-quality ( all-in-one ) computer from Dell, ensuring high system stability including on-site service (a 3-year warranty / in case of HW failure). It is designed for the operator ( it is not a self-service kiosk ) and you can operate it with the mouse / keyboard or via the touch screen - depending on the environment in which you work and whatever suits you better A maximum of 6 Mitsubishi printers can be connected to Click, including older models, ie Click can also be purchased as a separate terminal to replace the older Click 5000 to existing printers In the following we describe I Terminal Click120 - basic operation and program options II Printers for Click 120 - recommended Mitsubishi printers including older compatible models III Photo Print Me - program for ordering services on Click from mobile phone * IV Technical specification * In the following, we include at least one image to each program step, as Click 5000 users ask, how can I load images from smartphone, etc ..? If you have no time to read all, please read Chapter III Photo Print Me, as this is a brand new and 100% attractive application that allows all your customers to send orders from their mobile phones directly and ONLY to your Click.
|
|||
| I Terminal Click 120 / HW | ||||
|
|
||||
|
HW |
The Mitsubishi Click 120 is
based on computer DELL / Optiplex 3050 AIO serie Processor Intel i5 500 GB HDD 4 GB RAM Operation system Windows 10 Pro / 64 bit Touch screen 19,5" Resolution 1920 x 1080 Dimensions 48 x 32 x 6 cm / weight capp 6 kg |
|||
|
|
Terminal is supplied including * keyboard and mouse * power adaptor and mains cable * quick guide, USB cables and Recovery USB Flash ( please keep safe ) * 1 year subscription app PHOTO PRINT ME |
|||
|
HW |
 After unpacking, put the Click 120 on the table, plug the power adapter to the connector on the back of computer, USB cable to printer(s) and connect ( if you like ) keyboard / mouse 
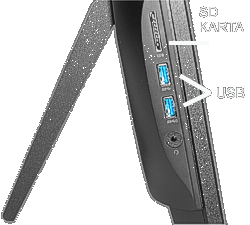
USB ports are on the side of the computer and at the back / bottom side, where you can also connect the network cable to the Internet (if you are not using WIFI ) 
 |
|||
|
Getting started with ... I Terminál Click 120 / LOADING IMAGES |
||||
|
|
||||
|
|
If you turn on the Click 120 -
the button is at the bottom right corner of the computer. The button is
small / almost tiny and additionally embedded, however, it is done
intentionally, so that the computer cant be inadvertently turned off. After switching on Click, the main menu will start. Click always displays images from Work Directory, ie you may see some Mitsuibishi demo images even for the first time on your screen.
To add new images,
press ADD PICTURES
|
|||
|
MAIN MENU |
 |
|||
|
LOADING IMAGES FROM WORK DIRECTORY |
The first option is to load images from the Work Directory. For example, we have created directories 1,2,3 .. however, you can create / delete directories and name them as you like (eg customer name / events ..). The Work Directory will be useful for storing images, eg for later reprinting of photographs, etc. At this stage you do not have anything in the Work Directory yet, ie another possibility is to download images from your iPhone / Android phone via USB cable  |
|||
|
LOADING IMAGES FROM iPHONE USING USB CABLE |
According to smartphone you have, choose first Smartphone-USB and later menu IOS / Android phone (bottom image with Android icon) The procedure is similar for both phones, follow the instructions in the menu, such as procedure how to load images from iPhone: 1 / Connect USB cable to Click and smartphone ( choose right adapter ) 2 / Unlock your iPhone while allowing access on your phone: Allow this device to acces photos and videos..? Press Allow and then click Next at Click menu 3 / You will see the folder (s) and then select the images you want to transfer to the main menu .. simple / fast There is no USB phone cable at Click, you can order it ( if you wish ) in our e-shop - iphone / iPad / android connection cable USB CABLE for iPhone/Android Menu to load images from iPhone / iPad  Menu to load images from iPhone / iPad |
|||
|
LOADING IMAGES FROM ANDROID SMARTPHONE USING USB CABLE
|
 |
|||
|
USB FLASH / EXPLORER |
If you have pictures on a USB flash drive, please press Explorer In our case, the USB flash is called Kingstone. After selecting USB flash or individual folder, press Next, the images will be transferred to the main menu ...  |
|||
|
BLUETOOTH |
Another option is to transfer images via Bluetooth, follow the menu ( iphone, ipad do not have Bluetooth interface anymore ), but for older phones Bluetooth interface is a nice option  |
|||
|
|
Images from your phone ( iPad ) can also be transferred wirelessly via WIFI / Smartphone-Wifi. It's simple, fast, the only downside is that customers have to download the Mitsubishi application to their phone first. The app is free, but from our experience most customers are reluctant to install another application on their phone. It pays to convince those customers who come regularly to your studio ro print photos. There is a menu for iPhone and other for Android phones again The application is similar to the self-service kiosk Mitsubishi, pls if you are interested, read LOADING OF IMAGES VIA WIFI Menu to load images from iPhone / iPad - WIFI  Menu to load images from android smartphone - WIFI |
|||
|
LOADING IMAGES FROM ANDROID
SMARTPHONE USING WIFI
|
 |
|||
|
LOADING IMAGES FROM FACEBOOK |
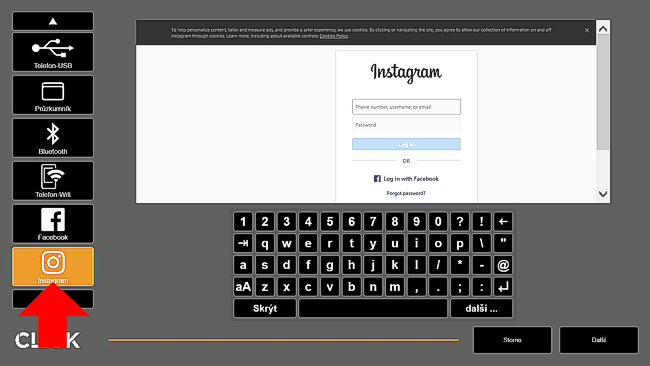
If you have a Click connected to the Internet, you have the option to load images directly from Facebook  If you have a Click connected to the Internet, you have the option to load images directly from Instagram |
|||
|
LOADING IMAGES FROM |
 |
|||
|
|
Whichever source you use, images will be displayed in the main menu after all. If you want to do anything with the image, you must first select / mark it ( see arrow ). If you press the button at point 2, all images will be selected at once. To see all the images larger, press the button at point 3. If you select the image (s), you can edit it - the editing tools are in the right vertical bar, or you can start with a service - all services are side by side in the bottom horizontal bar |
|||
| MAIN MENU |
 |
|||
| II Terminal Click 120 / EDITING TOOLS | ||||
|
|
||||
|
IMAGE EDITING TOOLS |
The image editing tools are at right vertical tool bar - see possibilities of Click at version 4.2.1 Separately menu PICTURE ADJUSTMENT and the CLONE STAMP Some functions - such as glossy / semi-matt finish, crop / whole-motive cut mode, etc. can be set directly in the single program modules  |
|||
|
RETOUCH
CLONE
|
RETOUCH OPTIONS
|
|||
| I Terminál Click 120 / SERVICES ( program modules ) | ||||
|
|
||||
|
CLICK SERVICES Direct Prints Prints Calendars Easyalbum Photo ID Greeting cards |
If you have images ready ( loaded and edited ) you have the option to print them directly, or insert them into Easyalbum / Calendar / Greetings .... Simply select the image (s) in the main menu and then the press service you want
|
|||
|
DIRECT |
DIRECT PRINT  If you select an image, pressing the DIRECT PRINT button will display the following menu where you have all the options in one menu, ie you can quickly see if something needs to be re-set - if not, just press NEXT and the image starts to print immediately Direct printing is the fastest alternative to print an image  |
|||
|
PRINTS |
PRINTS  After selecting an image and pressing the PRINTS button, you will see the following menu where you can select the print zize iddividualkly to each image, the number of copies and later print them all at once. If you press NEXT, you will see the same as for DIRECT PRINT (see the upper picture), ie again just quickly check the options and are already printing ... In addition, you can adjust colors ( if you haven't done that already ) before printing by pressing the Edit & Print button Digital photo is suitable if the customer brings a lot of files and requires different formats - you set everything at once and it then prints
|
|||
|
CALENDAR |
CALENDAR After selecting a picture and pressing the Calendar button, you will see a menu of one-sheet calendars, if you select 12 images, the offer of annual calendars ( with corpus ) will be also displayed Please choose the desired format 10x15 to A4, the starting date from which you want to create the calendar, and then choose the layout you like (see picture), place the image in the layout and print the required number of copies.  |
|||
|
EASYALBUM |
EASYALBUM To create a mini album you must have a minimum of 9 images ( it is better to have more ), to create an Easyalbaum10x15 with a front photo you need 12 images, to create an Easyalbum 15x20 you need min 11 images. Choose a background for your album - it can consist of your own pictures or pre-installed templates. The album is generated quickly and automatically, ie you can finally see final layout and you have the option to see assembled album sheet by sheet, deleting, swapping images, etc. Easyalbum is a fast application, when you need to do it quickly and do not have time to create an album as a photo book.  |
|||
|
PHOTO ID |
PHOTO ID The ID photo module allows you to place the customer's face in the zoom in / out mask, slightly rotate right / left, and print the desired format, respectively. send by email  |
|||
|
GREETING CARDS |
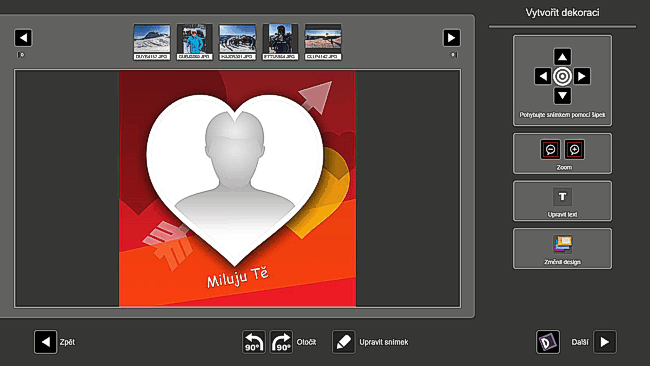
GREETING CARDS  Program module similar to calendar app .... choose format and then insert photo into the selected layout, you can also write text in your Greeting  |
|||
| II RECOMMENDED PRINTERS FOR CLICK 120 | ||||
|
|
||||
|
PRINTERS TO CLICK |
You can connect the following
printers ( from oldest to newest ) to Click120: 9 series CP-9550DW-S / CP-9820DW-S / CP-9820DW-AG 7 series CP-70DW / CP-D70DW-S / CP-D707DW / CP-D707DW-S A4 CP-3800DW 8 series CP-D80DW / CP-D80DW-S CK-K60DW-S duplex CP-W5000DW CP-D90DW / DW-P CP-M1E The combination
of Mitsubishi Click 120 with 2-connected CP-M1E printers seems to be a good
idea for your photo studio, allowing you to immediately offer ( without any
changes of ink sheet or paper ) these photo formats : |
|||
| III PHOTO PRINT ME | ||||
|
|
||||
|
PHOTO PRINT ME |
The one-year license of PHOTO PRINT ME is free with every Click 120. The PHOTO PRINT ME program allows to order services ( photos, calendars ... what you activate and you want to offer ) from mobile phones of all your customers. The customer does not need to install anything at all, just he will scan the QR code, which is unique ONLY for your Click and is included in the license. You can put this QR-code on your company website, in the store, or send it to your customers To give you an idea about functionality, here you have our QR code that is connected to our Click 120, which we have in the showroom. Please check yourself how it works ( QR code reader is usually in your mobile phone, some phones have this function already in the camera )  |
|||
|
|
||||
| DEMO VIDEO |
If you want, you can watch following demo video PHOTO PRINT ME |
|||
|
|
||||
|
MENU
NA MOBILNÍM TELEFONU ZÁKAZNÍKA |
After scanning, the customer will immediately enter the program - example: 1 Customer chooses a service ( prints, greetings, calendars, bookmarks, panoramic photos ....) we choose Prints 2 Choose the format of photos - we choose 10x15cm 3 Choose where are photos are - choose device (ie smartphone)  |
|||
|
|
4 Choose images - choose 3 images 5 We don't want anything else - we choose Continue 6 We do not want frames or cropping - we select all is OK  |
|||
|
|
7 Customer writes his name and phone Nr. into mobile phone 8 He sends an order Send He can see receipt number at last step ( = order number )
|
|||
|
PRINT ME MENU CLICK |
If you as the operator open the menu - ORDER PHOTOPRINT ME in the Click You can see the individual orders you received in the queu ( identified by customer name, phone number and receipt number ) These orders stays on the server until the customer comes to your store - then you CONFIRM the order and the order is printed  |
|||
| Technical specification | ||||
|
|
||||
| Click 120 | Click 120 / DELL Optiplex 3050 AIO serie | |||
| Processor | Processor Intel i5 | |||
| HDD | 500 GB | |||
| RAM | 4 GB | |||
| OS | Windows 10 Pro / 64 bit | |||
| Touch screen | 19,5" / 1920 x 1080 | |||
| Interface | 6 x USB , WIFI, Internet | |||
| Power requirements | power adaptor | |||
|
Dimensions (w x h x d) |
480 x 320 x 60 mm | |||
| Weight | 6 kg | |||
| Color | black | |||
| Accessories | Installation guide, Power Adaptor, Keyboard with mouse, USB cables, USB Recovery, licence Photo Print Me | |||
| P R I C E S |
|
|||
| Terminal Click 120 |
1.756 EUR without VAT ( terminal with complex program without printer ) | |||
| Printers |
Please select printer which fits you Printers Mitsubishi |
|||
|
|
||||
|
DOWNLOAD
|
|
|||
| Operation
Manual
Operation Manual Brochure |
||||


